


Practice on 2025 LATEST Workday-Pro-Integrations Exam Updated 79 Questions
Download Latest Workday-Pro-Integrations Dumps with Authentic Real Exam QA's
NEW QUESTION # 24
Refer to the scenario. You are implementing a Core Connector: Worker integration to send employee data to a third-party active employee directory. The external vendor requires the following:
* The Employee's Active Directory User Principal Name.
* A mapping from Worker Type values to external worker type codes.
* A specific filename format that includes a timestamp and sequence number.
You also need to ensure the document transformation occurs before the file is delivered to the endpoint. You must include an Employee's Active Directory User Principal Name (generated by a Calculated Field).
How do you ensure this field is pulled into the output?
- A. Configure an integration attribute.
- B. Configure an integration map.
- C. Configure an integration field attribute.
- D. Configure an integration field override.
Answer: D
Explanation:
To surface a Calculated Field in a Core Connector: Worker (CCW) outbound, you use an Integration Field Override to substitute the connector's default source with your calculated value. An integration map (Option A) is intended to translate or normalize code values (for example, mapping internal Worker Type codes to the vendor's codes), not to replace the source of a field. Integration attributes (Option D) and integration field attributes (Option C) manage connector behavior and attributes, but they do not replace a field's data source with a calculated field. Therefore, the correct method to "pull" a calculated field into the CCW output is an Integration Field Override (Option B).
Why the other elements in the scenario matter (and how they're handled) - with exact extracts from your materials:
* Mapping Worker Type to external codes # Integration Maps (supports, but not the asked action):Your deployment guides call out maintaining and using Integration System Maps for code translations. This is exactly where you'd map "Worker Type" to the external system's codes, but it is not how you inject a calculated field into the payload.
"Maintenance of Integration System Maps"
"WORKDAY SETUP - NON STATIC MAPS" and "WORKDAY SETUP - STATIC MAPS" (table of contents for configuration of maps)
* Filename requires timestamp/sequence number # Sequence Generator (supports the scenario):Your Time Tracking/PECI deployment guide explicitly includes a Sequence Generator configuration that's used with certified connectors to build compliant, unique file names (often with timestamps and/or sequence numbers) before delivery.
"3.6 Sequence Generator" (configuration item for certified integrations used in file naming)
* Transformation before delivery # Standard integration flow (transform then deliver):The same deployment materials describe document/file delivery mechanics (for example, SFTP), which occur after the integration produces/transforms the document. This supports the scenario requirement that transformation happens prior to transmission.
"4. FILE DELIVERY SERVICE ... 4.4 SFTP Configuration" (document delivery occurs after the integration generates/transforms the output)
* Security posture for integrations (context):For outbound/system users and secure delivery, the Workday Authentication & Security guide documents integration-appropriate authentication (e.g., X.509) and general integration security steps - relevant background for productionizing CCW but not directly affecting how to bring a calculated field into the payload.
"X509 Recommended for web services users and integrations that use an integration system user account." Putting it all together for the scenario:
* Use Integration Field Override to point the CCW field to your Calculated Field for UPN # (Correct answer: B).
* Use Integration Maps to translate Worker Type to the vendor's codes (supports the mapping requirement).
* Configure filename rules via Sequence Generator to include timestamp and sequence in the produced file name (supports the file-naming requirement).
* Ensure the document transformation runs as part of the integration generation step and then deliver via SFTP (file delivery service).
References (Workday Pro: Integrations-aligned materials):
* GPC_PECI_TimeTracking_DeploymentGuide_CloudPay.pdf - Sections "3.6 Sequence Generator" and "4. File Delivery Service" (delivery occurs after file generation/transform).
* GPC_PECI_DeploymentGuide_CloudPay_2.9.pdf - Map configuration sections ("WORKDAY SETUP - NON STATIC MAPS", "WORKDAY SETUP - STATIC MAPS").
* GPC_PECI_UserGuide_CloudPay_2.1.1.pdf - "Maintenance of Integration System Maps."
* Admin-Guide-Authentication-and-Security.pdf - Integration security notes, including X.509 recommendation for integrations.
NEW QUESTION # 25
Refer to the following scenario to answer the question below.
You need to configure a Core Connector: Candidate Outbound integration for your vendor. The connector requires the data initialization service (DIS).
The vendor needs a value on the output file which contains the average number of jobs a candidate applied to.
This value is not delivered by Workday so you have identified that you will need to build a calculated field to generate this value.
What steps do you follow to output the calculated field?
- A. Configure integration attributes to output the calculation.
- B. Configure integration field overrides to output the calculation.
- C. Configure a custom field override service to output the calculation.
- D. Configure integration field attributes to output the calculation.
Answer: B
Explanation:
The scenario involves a Core Connector: Candidate Outbound integration requiring a calculated field for the average number of jobs a candidate applied to, which isn't a delivered Workday field. The task is to output this calculated field in the integration file. Core Connectors in Workday use predefined templates but allow customization through various configuration options. Let's evaluate the steps:
* Context:
* Core Connector: Candidate Outbound uses the Data Initialization Service (DIS) to extract candidate data.
* A calculated field must be created (e.g., averaging the "Number of Job Applications" field across a candidate's records).
* This value needs to be included in the output file sent to the vendor.
* Integration Field Overrides:In Core Connectors, calculated fields are typically incorporated into the output by definingintegration field overrides. This feature allows you to map a calculated field to a specific field in the connector's output structure, overriding the default delivered value (or adding a new field). The calculated field is built separately (e.g., in Report Writer or Calculated Fields) and then referenced in the integration configuration.
* Option Analysis:
* A. Configure a custom field override service to output the calculation: Incorrect. There's no
"custom field override service" in Workday Core Connectors. This might confuse with integration field overrides, but it's not a distinct service.
* B. Configure integration attributes to output the calculation: Incorrect. Integration attributes define metadata or settings for the integration (e.g., file name, delivery method), not specific field mappings for output data.
* C. Configure integration field attributes to output the calculation: Incorrect. "Integration field attributes" isn't a precise Workday term for this purpose; it may confuse with field-level settings, but field overrides are the correct mechanism.
* D. Configure integration field overrides to output the calculation: Correct. This is the standard method in Core Connectors to include calculated fields in the output file by overriding or adding to the delivered field structure.
* Implementation:
* Create a calculated field (e.g., "Average Job Applications") using functions like Arithmetic Calculation to average job application counts.
* In the Core Connector configuration, navigate to theIntegration Field Overridessection.
* Define a new field or override an existing one, mapping it to the calculated field.
* Test the integration to ensure the calculated value appears in the output file.
References from Workday Pro Integrations Study Guide:
* Core Connectors & Document Transformation: Section on "Configuring Integration Field Overrides" explains mapping calculated fields to output files.
* Integration System Fundamentals: Details how Core Connectors extend delivered functionality with custom calculations.
NEW QUESTION # 26
Refer to the scenario. You are configuring a Core Connector: Worker integration with the Data Initialization Service (DIS) enabled that runs once daily. The integration must extract only active worker records with changes to compensation, home address, or business title since the last run 24 hours ago, using Workday's change detection to avoid full extracts.
During testing, an employee's home address is updated, but the integration does not detect the change in the output. The employee is eligible, the connector uses the correct integration field attributes, and the launch parameters are properly configured for a Full-Diff extract.
What configuration task must you modify from the integration system to ensure the expected change is included in the output?
- A. Edit Subscriptions
- B. Configure Integration Field Overrides
- C. Maintain Integration Attributes
- D. Configure Integration Transaction Log
Answer: A
Explanation:
This question pertains to a Core Connector: Worker integration configured with Data Initialization Service (DIS) enabled and scheduled to run once daily. The integration is set to extract only those worker records where changes have occurred in compensation, home address, or business title since the last execution - leveraging Workday's change detection to avoid full file extracts.
In testing, when a home address update occurs, the integration fails to capture this change in its output. However, all other components - such as worker eligibility, integration field attributes, and Full-Diff parameters - are confirmed to be correctly configured.
The critical element missing here is the event subscription. In Workday, for a Core Connector to recognize changes via Full-Diff or delta mode, it must be properly subscribed to the specific change events that should trigger inclusion in the output. This is done using the Edit Subscriptions configuration.
From the Workday Pro: Integrations documentation:
"The Edit Subscriptions task defines the set of data changes (e.g., job changes, address changes, compensation updates) that the integration system listens for. If an event type is not included in the subscription, changes related to that event will not be picked up in either delta or Full-Diff mode, regardless of other configuration." In this scenario, although the integration is configured for Full-Diff, failure to include "Home Address Change" in the subscription list prevents the system from recognizing the update, thereby omitting it from the output file.
Incorrect Options Explained:
A . Configure Integration Field OverridesThis option is used to override or map integration field values but has no impact on whether a change is detected or included in the output.
B . Maintain Integration AttributesWhile this configuration manages connector behavior and filtering rules, it does not control the detection of specific event changes.
D . Configure Integration Transaction LogThis is used for tracking and audit purposes but does not affect change detection or output inclusion.
Reference:
Workday Pro: Integrations Curriculum - Core Connector: Worker
Workday Community Article: Configuring Core Connectors and Change Detection with Edit Subscriptions GPC_PECI_DeploymentGuide_CloudPay_2.9.pdf - Section: Integration Configuration & Subscriptions
NEW QUESTION # 27
What is the purpose of the <xsl:template> element?
- A. Provide rules to apply to a specified node.
- B. Grant access to the XSLT language.
- C. Determine the output file type.
- D. Generate an output file name.
Answer: A
NEW QUESTION # 28
You have successfully configured an ISU and an ISSG with the correct security policies and have assigned them to an EIB.
What task do you need to run before you can launch the EIB?
- A. View Security for Securable Item
- B. Activate Pending Security Policy Changes
- C. Assign the ISSG to only one security policy
- D. Maintain Integration Security Policies
Answer: B
Explanation:
In Workday, after configuring an Integration System User (ISU) and an Integration System Security Group (ISSG) with the appropriate security policies and assigning them to an Enterprise Interface Builder (EIB) integration, there is a critical step required before the EIB can be launched successfully. This step ensures that all security configurations and permissions assigned to the ISSG take effect in the Workday tenant. Let's analyze the question and evaluate each option systematically to determine the correct task, ensuring the answer aligns with Workday's documented processes and the Workday Pro Integrations Study Guide.
Context of the Scenario
You've completed the following:
Created an ISU and configured it (e.g., with "Do Not Allow UI Sessions" checked for web service-only access).
Set up an ISSG and assigned the ISU to it.
Defined the necessary security policies (e.g., domain security policies with "Get" and/or "Put" access) for the ISSG to support the EIB's operations.
Assigned the ISU and ISSG to the EIB integration system.
The question now is what must be done before launching the EIB to ensure it functions as intended. In Workday, changes to security policies-such as adding permissions to an ISSG-do not take effect immediately. They remain in a "pending" state until activated, which is a key aspect of Workday's security administration process.
Evaluation of Options
Option A: Activate Pending Security Policy ChangesIn Workday, whenever you modify security policies (e.g., granting domain permissions like "Integration Build" or "Custom Report Creation" to an ISSG), these changes are staged as "pending." To apply them to the tenant and make them active, you must run the "Activate Pending Security Policy Changes" task. This task reviews all pending security updates, allows you to add a comment for audit purposes, and, upon confirmation, activates the changes. Without this step, the ISSG will not have the effective permissions required for the EIB to access data or execute its operations, potentially causing the launch to fail due to insufficient authorization. This aligns directly with the scenario, as security policies have been configured and assigned, but not yet activated.
Option B: View Security for Securable ItemThe "View Security for Securable Item" report is a diagnostic tool in Workday that allows you to inspect the security configuration for a specific object (e.g., a web service operation, report, or task). It shows which security groups have access and what permissions (e.g., "Get," "Put," "View," "Modify") are granted. While this is useful for verifying that the ISSG has the correct policies assigned, it is a passive report-it does not modify or activate anything. Running this task would not enable the EIB to launch, as it doesn't affect the pending security changes. Thus, it's not the required step before launching the EIB.
Option C: Assign the ISSG to only one security policyThis option suggests limiting the ISSG to a single security policy, but this is neither a standard Workday requirement nor a task that exists as a standalone action. ISSGs can and often do have multiple security policies assigned (e.g., permissions for various domains like "Integration Build," "Custom Report Access," etc.), depending on the integration's needs. Moreover, the question states that the ISSG has already been configured with the "correct security policies" and assigned to the EIB, implying this step is complete. Restricting the ISSG to one policy after the fact would require editing permissions again, triggering more pending changes, and still necessitate activation-making this option illogical and incorrect.
Option D: Maintain Integration Security PoliciesThere is no specific task in Workday called "Maintain Integration Security Policies." This option seems to be a misnomer or a conflation of other tasks, such as "Maintain Domain Permissions for Security Group" (used to assign permissions to an ISSG) or broader security maintenance activities. However, the question indicates that the security policies are already correctly configured and assigned. If this option intended to imply further configuration, it would still result in pending changes requiring activation via Option A. As a standalone action, it does not represent a valid or necessary task to enable the EIB launch.
Why Option A is Correct
The "Activate Pending Security Policy Changes" task is a mandatory step in Workday's security workflow after modifying security policies, such as those assigned to an ISSG for an EIB. Workday's security model uses a pending changes queue to ensure that updates are reviewed and deliberately applied, maintaining control and auditability. Without activating these changes:
The ISSG will lack the effective permissions needed for the EIB to access required domains or perform its operations (e.g., retrieving data from a custom report or delivering a file).
The EIB launch could fail with errors like "Insufficient Privileges" or "Access Denied." Running this task ensures that the security configuration is live, allowing the ISU (via the ISSG) to authenticate and execute the EIB successfully. This is a standard practice in Workday integration setup, as emphasized in the Workday Pro Integrations curriculum.
Practical Steps to Perform Option A
Log into the Workday tenant with a security administrator role.
Search for and select the "Activate Pending Security Policy Changes" task.
Review the list of pending changes (e.g., new permissions added to the ISSG).
Enter a comment (e.g., "Activating security for EIB launch - ISSG permissions").
Check the "Confirm" box and click "OK" to activate the changes.
Once completed, the security policies are live, and the EIB can be launched.
Verification with Workday Documentation
The Workday Pro Integrations Study Guide and related training materials confirm that activating pending security policy changes is a prerequisite after configuring security for integrations. This step ensures that all permissions are in effect, enabling the ISU and ISSG to support the EIB's functionality. Community resources and implementation guides also consistently highlight this task as the final step before launching integrations that rely on updated security settings.
Workday Pro Integrations Study Guide Reference
Section: Integration Security Configuration - Explains the process of assigning security policies to ISSGs and the need to activate changes to operationalize them.
Section: Enterprise Interface Builder (EIB) - Notes that security updates for EIBs must be activated before launching to ensure proper access.
Section: Security Administration - Details the "Activate Pending Security Policy Changes" task as the mechanism to apply pending security modifications across the tenant.
NEW QUESTION # 29
What attribute(s) can go into the xsl:stylesheet element?
- A. XML Version & Namespaces
- B. XSLT Version & Namespaces
- C. Namespaces & Encoding
- D. XSLT Version & Encoding
Answer: B
Explanation:
The <xsl:stylesheet> element is the root element in an XSLT document. It must include:
XSLT Version - This defines the XSLT specification version being used (e.g., version="1.0" or version="2.0").
Namespaces - XSLT operates within an XML namespace (xmlns:xsl="http://www.w3.org/1999/XSL/Transform"), which is required to define the transformation rules.
Breakdown of Answer Choices:
A . XSLT Version & Namespaces ✅ (Correct)
The <xsl:stylesheet> element requires both the XSLT version and the namespace declaration for proper execution.
Example:
xml
CopyEdit
<xsl:stylesheet version="1.0" xmlns:xsl="http://www.w3.org/1999/XSL/Transform"> B . XSLT Version & Encoding ❌ (Incorrect) Encoding (encoding="UTF-8") is a property of the XML declaration (<?xml version="1.0" encoding="UTF-8"?>), not an attribute of <xsl:stylesheet>.
C . XML Version & Namespaces ❌ (Incorrect)
XML version (<?xml version="1.0"?>) is part of the XML prolog, not an attribute of <xsl:stylesheet>.
D . Namespaces & Encoding ❌ (Incorrect)
Encoding is not an attribute of <xsl:stylesheet>.
Final Correct Syntax:
<xsl:stylesheet version="1.0" xmlns:xsl="http://www.w3.org/1999/XSL/Transform"> This ensures that the XSLT file is processed correctly.
Workday Pro Integrations Study Guide Reference:
ReportWriterTraining.pdf - Chapter 9: Working With XML and XSLT covers XSLT basics, including the required attributes for <xsl:stylesheet> .
Workday_Advanced_Business_Process_part_2.pdf - Chapter 5: Web Services and Integrations details how Workday uses XSLT for transformations .
NEW QUESTION # 30
You need to filter a custom report to only show workers that have been terminated after a user-prompted date.
How do you combine conditions in the filter to meet this requirement?
- A. Worker Status is equal to the value "Terminated" OR Termination Date is greater than a value retrieved from a prompt
- B. Worker Status is equal to the value retrieved from a prompt AND Termination Date is less than a value retrieved from a prompt.
- C. Worker Status is equal to the value "Terminated" AND Termination Date is greater than a value retrieved from a prompt.
- D. Worker Status is equal to the value retrieved from a prompt OR Termination Date is equal to a value retrieved from a prompt.
Answer: C
Explanation:
The requirement is to filter a custom report to show only workers terminated after a user-prompted date. In Workday, filters are defined in the Filter tab of the custom report definition, and conditions can be combined using AND/OR logic to refine the dataset. Let's analyze the requirement and options:
* Key Conditions:
* Workers must beterminated, so the "Worker Status" field must equal "Terminated."
* The termination must occuraftera user-specified date, so the "Termination Date" must be greater than the prompted value.
* Both conditions must be true for a worker to appear in the report, requiring anANDcombination.
* Option Analysis:
* A. Worker Status is equal to the value "Terminated" OR Termination Date is greater than a value retrieved from a prompt: Incorrect. Using OR means the report would include workers who are terminated (regardless of date) OR workers with a termination date after the prompt (even if not terminated), which doesn't meet the strict requirement of terminated workers after a specific date.
* B. Worker Status is equal to the value retrieved from a prompt AND Termination Date is less than a value retrieved from a prompt: Incorrect. Worker Status shouldn't be a prompted value (it's fixed as "Terminated"), and "less than" would show terminations before the date, not after.
* C. Worker Status is equal to the value retrieved from a prompt OR Termination Date is equal to a value retrieved from a prompt: Incorrect. Worker Status shouldn't be prompted, and
"equal to" limits the filter to exact matches, not "after" the date. OR logic also broadens the scope incorrectly.
* D. Worker Status is equal to the value "Terminated" AND Termination Date is greater than a value retrieved from a prompt: Correct. This ensures workers are terminated (fixed value) AND their termination date is after the user-entered date, precisely meeting the requirement.
* Implementation:
* In the custom report's Filter tab, add two conditions:
* Field: Worker Status, Operator: equals, Value: "Terminated".
* Field: Termination Date, Operator: greater than, Value: Prompt for Date (configured as a report prompt).
* Set the logical operator between conditions toAND.
* Test with a sample date to verify only terminated workers after that date appear.
References from Workday Pro Integrations Study Guide:
* Workday Report Writer Fundamentals: Section on "Creating and Managing Filters" details combining conditions with AND/OR logic and using prompts.
* Integration System Fundamentals: Notes how filtered reports support integration data sources with dynamic user inputs.
NEW QUESTION # 31
Refer to the following scenario to answer the question below.
You have been asked to build an integration using the Core Connector: Worker template and should leverage the Data Initialization Service (DIS). The integration will be used to export a full file (no change detection) for employees only and will include personal data.
What configuration is required to ensure that only employees, and not contingent workers, are output by this integration?
- A. Configure a map for worker type in the Integration Maps.
- B. Configure worker type in the Integration Field Attributes.
- C. Configure eligibility in the Integration Field Overrides.
- D. Configure the Integration Population Eligibility.
Answer: D
Explanation:
The scenario involves a Core Connector: Worker integration using DIS to export a full file of personal data, restricted to employees only (excluding contingent workers). In Workday, the Worker business object includes both employees and contingent workers, so a filter is needed to limit the population. Let's explore the configuration:
Requirement:Ensure the integration outputs only employees, not contingent workers. This is a population-level filter, not a field transformation or override.
Integration Population Eligibility:In Core Connectors, the Configure Integration Population Eligibility related action defines which workers are included in the integration's dataset. You can set eligibility rules, such as "Worker Type equals Employee" (or exclude "Contingent Worker"), to filter the population before data is extracted. For a full file export (no change detection), this ensures the entire output is limited to employees.
Option Analysis:
A . Configure the Integration Population Eligibility: Correct. This filters the worker population to employees only, aligning with the requirement at the dataset level.
B . Configure a map for worker type in the Integration Maps: Incorrect. Integration Maps transform field values (e.g., "Employee" to "EMP"), not filter the population of workers included in the extract.
C . Configure worker type in the Integration Field Attributes: Incorrect. Integration Field Attributes refine how a field is output (e.g., phone type), not the overall population eligibility.
D . Configure eligibility in the Integration Field Overrides: Incorrect. Integration Field Overrides replace field values with custom data (e.g., a calculated field), not define the population of workers.
Implementation:
Edit the Core Connector: Worker integration.
Use the related action Configure Integration Population Eligibility.
Add a rule: "Worker Type equals Employee" (or exclude "Contingent Worker").
Save and test to ensure only employee data is exported.
Reference from Workday Pro Integrations Study Guide:
Core Connectors & Document Transformation: Section on "Configuring Integration Population Eligibility" explains filtering the worker population for outbound integrations.
Integration System Fundamentals: Discusses population scoping in Core Connectors to meet specific export criteria.
NEW QUESTION # 32
What is the task used to upload a new XSLT file for a pre-existing document transformation integration system?
- A. Edit Integration Attachment Service
- B. Edit Integration Attachment
- C. Edit XSLT Attachment Transformation
- D. Edit Integration Service Attachment
Answer: C
Explanation:
In Workday, when you need to upload a new XSLT (Extensible Stylesheet Language Transformations) file to modify or replace an existing transformation within a pre-existing document transformation integration system, the specific task required is "Edit XSLT Attachment Transformation." This task allows users to update the XSLT file that governs how XML data is transformed within the integration system without creating an entirely new transformation object.
Here's why this is the correct answer:
* Workday's integration systems often rely on XSLT to transform XML data into the desired format for downstream systems or processes. When an XSLT file has already been associated with an integration system (e.g., as part of an Enterprise Interface Builder (EIB) or a Document Transformation Connector), updating it requires accessing the existing transformation configuration.
* The "Edit XSLT Attachment Transformation" task enables users to upload a revised version of the XSLT file. This action replaces the previous file while maintaining the integration system's configuration, ensuring continuity without necessitating additional changes to the system itself.
* This task is distinct from other options because it specifically targets the transformation logic (XSLT) rather than broader integration components or services.
Let's examine why the other options are incorrect:
* A. Edit Integration Attachment: This task is used to manage generic attachments associated with an integration, such as input files or supplementary documents, but it does not specifically address XSLT transformations. It lacks the precision required for updating transformation logic.
* B. Edit Integration Attachment Service: This is not a recognized task in Workday's integration framework. It appears to be a conflation of terms and does not align with the documented processes for managing XSLT files.
* D. Edit Integration Service Attachment: While this might suggest modifying an attachment related to an integration service, it is not the correct task for handling XSLT files in a document transformation context. Workday documentation consistently points to "Edit XSLT Attachment Transformation" for this purpose.
The process typically involves:
* Navigating to the integration system in Workday (e.g., via the "Search" bar by entering the integration system name).
* Using the related actions menu to select "Integration System" > "Edit XSLT Attachment Transformation."
* Uploading the new XSLT file, which must comply with Workday's size limitations (e.g., 30 MB for attachments) and be properly formatted.
* Saving the changes, which updates the transformation logic without altering other integration configurations.
This approach ensures that transformations remain aligned with business requirements, such as reformatting data for compatibility with external systems, while leveraging Workday's secure and efficient integration tools.
References:
* Workday Pro Integrations Study Guide: "Configure Integration System - TRANSFORMATION" section, which details the use of XSLT files in document transformations and the associated tasks.
* Workday Documentation: "Enterprise Interface Builder (EIB)" and "Document Transformation Connector" sections, where the "Edit XSLT Attachment Transformation" task is outlined for updating XSLT files.
* Workday Community: Guidance on managing XSLT attachments, confirming this task as the standard method for updating pre-existing transformations.
NEW QUESTION # 33
What is the purpose of a namespace in the context of a stylesheet?
- A. Controls the filename of the transformed result.
- B. Provides elements you can use in your code.
- C. Restricts the data the processor can access.
- D. Indicates the start and end tag names to output.
Answer: B
Explanation:
In the context of a stylesheet, particularly within Workday's Document Transformation system where XSLT (Extensible Stylesheet Language Transformations) is commonly used, a namespace serves a critical role in defining the scope and identity of elements and attributes. The correct answer, as aligned with Workday's integration practices and standard XSLT principles, is that a namespace "provides elements you can use in your code." Here's a detailed explanation:
* Definition and Purpose of a Namespace:
* A namespace in an XML-based stylesheet (like XSLT) is a mechanism to avoid naming conflicts by grouping elements and attributes under a unique identifier, typically a URI (Uniform Resource Identifier). This allows different vocabularies or schemas to coexist within the same document or transformation process without ambiguity.
* In XSLT, namespaces are declared in the stylesheet using the xmlns attribute (e.g., xmlns:xsl="
http://www.w3.org/1999/XSL/Transform" for XSLT itself). These declarations define the set of elements and functions available for use in the stylesheet, such as <xsl:template>, <xsl:value-of>, or <xsl:for-each>.
* For example, when transforming Workday data (which uses its own XML schema), a namespace might be defined to reference Workday-specific elements, enabling the stylesheet to correctly identify and manipulate those elements.
* Application in Workday Context:
* In Workday's Document Transformation integrations, namespaces are essential when processing XML data from Workday (e.g., Core Connector outputs) or external systems. The namespace ensures that the XSLT processor recognizes the correct elements from the source XML and applies the transformation rules appropriately.
* Without a namespace, the processor might misinterpret elements with the same name but different meanings (e.g., <name> in one schema vs. another). By providing a namespace, the stylesheet gains access to a specific vocabulary of elements and attributes, enabling precise coding of transformation logic.
* Why Other Options Are Incorrect:
* B. Indicates the start and end tag names to output: This is incorrect because namespaces do not dictate the structure (start and end tags) of the output. That is determined by the XSLT template rules and output instructions (e.g., <xsl:output> or literal result elements). Namespaces only define the identity of elements, not their placement or formatting in the output.
* C. Restricts the data the processor can access: While namespaces help distinguish between different sets of elements, they do not inherently restrict data access. Restrictions are more a function of security settings or XPath expressions within the stylesheet, not the namespace itself.
* D. Controls the filename of the transformed result: Namespaces have no bearing on the filename of the output. In Workday, the filename of a transformed result is typically managed by the Integration Attachment Service or delivery settings (e.g., SFTP or email configurations), not the stylesheet's namespace.
* Practical Example:
* Suppose you're transforming a Workday XML file containing employee data into a custom format. The stylesheet might include:
<xsl:stylesheet version="1.0" xmlns:xsl="http://www.w3.org/1999/XSL/Transform" xmlns:wd="http://www.
workday.com/ns">
<xsl:template match="wd:Employee">
<EmployeeName><xsl:value-of select="wd:Name"/></EmployeeName>
</xsl:template>
</xsl:stylesheet>
* Here, the wd namespace provides access to Workday-specific elements like <wd:Employee> and
<wd:Name>, which the XSLT processor can then use to extract and transform data.
Workday Pro Integrations Study Guide References:
* Workday Integration System Fundamentals: Explains XML and XSLT basics, including the role of namespaces in identifying elements within stylesheets.
* Document Transformation Module: Highlights how namespaces are used in XSLT to process Workday XML data, emphasizing their role in providing a vocabulary for transformation logic (e.g.,
"Understanding XSLT Namespaces").
* Core Connectors and Document Transformation Course Manual: Includes examples of XSLT stylesheets where namespaces are declared to handle Workday-specific schemas, reinforcing that they provide usable elements.
* Workday Community Documentation: Notes that namespaces are critical for ensuring compatibility between Workday's XML output and external system requirements in transformation scenarios.
NEW QUESTION # 34
You have been asked to create an integration using the Core Connector: Worker with DIS template. The vendor has requested that you only include employees who are based in the San Francisco area that are on leave.
How do you configure your integration so that only workers who meet the requirements are included in the output file?
- A. Configure the integration attributes to include workers in San Francisco on leave.
- B. Configure a Boolean field for Population Eligibility for San Francisco workers on leave.
- C. Configure a Boolean field for San Francisco workers on leave under the field attributes.
- D. Configure a Boolean field for San Francisco workers on leave in the field overrides.
Answer: B
Explanation:
When using Core Connector: Worker with DIS, to restrict the population to employees who:
Are on leave, and
Are located in San Francisco
You must configure Population Eligibility, which is the only place to filter the worker population included in the connector output.
From Workday Pro documentation:
"The Population Eligibility section defines which workers are eligible for extraction in the integration based on location, status, organization, and other conditions. Boolean calculated fields can be used here to define complex eligibility criteria." In this case:
Create a Boolean calculated field that returns true for "On Leave AND Location = San Francisco" Use that field in Population Eligibility Why the others are incorrect:
A, D. Field Overrides and Field Attributes only modify what data is extracted-not who is included.
C . Integration Attributes don't control population filtering.
NEW QUESTION # 35
You need to create a report that includes data from multiple business objects. For a supervisory organization specified at run time, the report must output one row per worker, their active benefit plans, and the names and ages of all related dependents. The Worker business object contains the Employee, Benefit Plans, and Dependents fields. The Dependent business object contains the employee's dependent's Name and Age fields.
How would you select the primary business object (PBO) and related business objects (RBO) for the report?
- A. PBO: Dependent, no RBOs
- B. PBO: Worker; no RBOs
- C. PBO: Dependent, RBO: Worker
- D. PBO: Worker, RBO: Dependent
Answer: D
Explanation:
In Workday reporting, selecting the appropriate Primary Business Object (PBO) and Related Business Objects (RBOs) is critical to ensure that the report retrieves and organizes data correctly based on the requirements. The requirement here is to create a report that outputs one row per worker for a specified supervisory organization, including their active benefit plans and the names and ages of all related dependents. The Worker business object contains fields like Employee, Benefit Plans, and Dependents, while the Dependent business object provides the Name and Age fields for dependents.
Why Worker as the PBO?The report needs to output "one row per worker," making the Worker business object the natural choice for the PBO. In Workday, the PBO defines the primary dataset and determines the granularity of the report (i.e., one row per instance of the PBO). Since the report revolves around workers and their associated data (benefit plans and dependents), Worker is the starting point. Additionally, the requirement specifies a supervisory organization at runtime, which is a filter applied to the Worker business object to limit the population.
Why Dependent as an RBO?The Worker business object includes a "Dependents" field, which is a multi-instance field linking to the Dependent business object. To access detailed dependent data (Name and Age), the Dependent business object must be added as an RBO. This allows the report to pull in the related dependent information for each worker. Without the Dependent RBO, the report could only reference the existence of dependents, not their specific attributes like Name and Age.
Analysis of Benefit Plans:The Worker business object already contains the "Benefit Plans" field, which provides access to active benefit plan data. Since this is a field directly available on the PBO (Worker), no additional RBO is needed to retrieve benefit plan information.
Option Analysis:
A . PBO: Dependent, RBO: Worker: Incorrect. If Dependent were the PBO, the report would output one row per dependent, not one row per worker, which contradicts the requirement. Additionally, Worker as an RBO would unnecessarily complicate accessing worker-level data.
B . PBO: Worker, RBO: Dependent: Correct. This aligns with the requirement: Worker as the PBO ensures one row per worker, and Dependent as the RBO provides access to dependent details (Name and Age). Benefit Plans are already accessible via the Worker PBO.
C . PBO: Dependent, no RBOs: Incorrect. This would result in one row per dependent and would not allow easy access to worker or benefit plan data, failing to meet the "one row per worker" requirement.
D . PBO: Worker, no RBOs: Incorrect. While Worker as the PBO is appropriate, omitting the Dependent RBO prevents the report from retrieving dependent Name and Age fields, which are stored in the Dependent business object, not directly on Worker.
Implementation:
Create a custom report with Worker as the PBO.
Add a filter for the supervisory organization (specified at runtime) on the Worker PBO.
Add Dependent as an RBO to access Name and Age fields.
Include columns from Worker (e.g., Employee, Benefit Plans) and Dependent (e.g., Name, Age).
Reference from Workday Pro Integrations Study Guide:
Workday Report Writer Fundamentals: Section on "Selecting Primary and Related Business Objects" explains how the PBO determines the report's row structure and RBOs extend data access to related objects.
Integration System Fundamentals: Discusses how multi-instance fields (e.g., Dependents on Worker) require RBOs to retrieve detailed attributes.
NEW QUESTION # 36
Your manager has asked for a value on their dashboard for how many days away the birthdays are of their direct reports. The format of the output should be [Worker's Name]'s birthday is in [X] days, where you must calculate the number of days until a Worker's next birthday. An example output is "Logan McNeil's birthday is in 103 days." Which calculated field functions do you need to accomplish this?
- A. Date Difference, Format Number, Text Constant, Concatenate Text
- B. Increment or Decrement Date, Format Number, Text Constant, Concatenate Text
- C. Format Date, Increment or Decrement Date, Extract Single Instance, Format Text
- D. Build Date, Format Date, Extract Single Instance, Format Text
Answer: A
Explanation:
Implementation:
D). Increment or Decrement Date, Format Number, Text Constant, Concatenate Text: Incorrect. Increment or Decrement Date can't directly calculate days to a future birthday without additional complexity; Date Difference is more appropriate.
Use Date Difference to calculate days from today to the next birthday (adjusting the year dynamically with additional logic if needed).
Apply Format Number to ensure the result is a clean integer.
Use Text Constant for static text ("'s birthday is in " and " days").
Use Concatenate Text to combine Worker Name, static text, and the formatted number.
Reference from Workday Pro Integrations Study Guide:
Workday Calculated Fields: Section on "Date Functions" explains Date Difference for calculating time spans.
Report Writer Fundamentals: Covers Concatenate Text and Text Constant for string building in reports.
Explanation:
The requirement is to create a calculated field for a dashboard that displays a worker's name and the number of days until their next birthday in the format "[Worker's Name]'s birthday is in [X] days" (e.g., "Logan McNeil's birthday is in 103 days"). This involves calculating the difference between today's date and the worker's next birthday, then formatting the output as a text string. Let's break down the necessary functions:
Date Difference:To calculate the number of days until the worker's next birthday, you need to determine the difference between the current date and the worker's birthdate in the current or next year (whichever is upcoming). The Date Difference function calculates the number of days between two dates. In this case:
Use the worker's "Date of Birth" field (from the Worker business object).
Adjust the year of the birthdate to the current year or next year (if the birthday has already passed this year) using additional logic.
Calculate the difference from today's date to this adjusted birthday date. For example, if today is February 21, 2025, and Logan's birthday is June 4 (adjusted to June 4, 2025), Date Difference returns 103 days.
Format Number:The result of Date Difference is a numeric value (e.g., 103). To ensure it displays cleanly in the output string (without decimals or unnecessary formatting), Format Number can be used to convert it to a simple integer string (e.g., "103").
Text Constant:To build the output string, static text like "'s birthday is in " and " days" is needed. The Text Constant function provides fixed text values to include in the final concatenated result.
Concatenate Text:The final step is to combine the worker's name (e.g., "Logan McNeil"), the static text, and the calculated days into one string. Concatenate Text merges multiple text values into a single output, such as "Logan McNeil" + "'s birthday is in " + "103" + " days".
Option Analysis:
A . Format Date, Increment or Decrement Date, Extract Single Instance, Format Text: Incorrect. Format Date converts dates to strings but doesn't calculate differences. Increment or Decrement Date adjusts dates but isn't suited for finding days until a future event. Extract Single Instance is for multi-instance fields, not relevant here. Format Text adjusts text appearance, not numeric calculations.
B . Build Date, Format Date, Extract Single Instance, Format Text: Incorrect. Build Date creates a date from components, useful for setting the next birthday, but lacks the difference calculation. Format Date and Extract Single Instance don't apply to the core need.
C . Date Difference, Format Number, Text Constant, Concatenate Text: Correct. These functions cover calculating the days, formatting the number, adding static text, and building the final string.
NEW QUESTION # 37
Refer to the following scenario to answer the question below.
You need to configure a Core Connector: Candidate Outbound integration for your vendor. The connector requires the data initialization service (DIS).
The vendor requests additional formatting of the candidate Country field. For example, if a candidate's country is the United States of America, the output should show USA.
What steps do you follow to meet this request?
- A. Use the integration services to only output shortened country codes.
- B. Use the integration related action Configure Integration Maps.
- C. Use the integration related action Configure Integration Population Eligibility.
- D. Use an Evaluated Expression calculation and add it to the integration's report data source.
Answer: B
Explanation:
The scenario involves a Core Connector: Candidate Outbound integration with the Data Initialization Service (DIS), where the vendor requires the "Country" field to be formatted differently (e.g., "United States of America" to "USA"). This is a data transformation requirement, and Core Connectors provide specific tools to handle such formatting. Let's evaluate the solution:
* Requirement:The vendor needs a shortened country code (e.g., "USA" instead of "United States of America") in the output file. This involves transforming the delivered "Country" field value from the Candidate business object into a vendor-specific format.
* Integration Maps:In Workday Core Connectors, integration maps are used to transform or map field values from Workday's format to a vendor's required format. For example, you can create a map that replaces "United States of America" with "USA," "Canada" with "CAN," etc. This is configured via the
"Configure Integration Maps" related action on the integration system, allowing you to define a lookup table or rule-based transformation for the Country field.
* Option Analysis:
* A. Use an Evaluated Expression calculation and add it to the integration's report data source:
Incorrect. While an Evaluate Expression calculated field could transform the value (e.g., if-then logic), Core Connectors don't directly use report data sources for output formatting. Calculated fields are better suited for custom reports or EIBs, not Core Connector field mapping.
* B. Use the integration related action Configure Integration Population Eligibility: Incorrect. This action filters the population of candidates included (e.g., based on eligibility criteria), not the formatting of individual fields like Country.
* C. Use the integration services to only output shortened country codes: Incorrect. Integration services define the dataset or events triggering the integration, not field-level formatting or transformations.
* D. Use the integration related action Configure Integration Maps: Correct. Integration maps are the standard Core Connector tool for transforming field values (e.g., mapping "United States of America" to "USA") to meet vendor requirements.
* Implementation:
* Navigate to the Core Connector: Candidate Outbound integration system.
* Use the related action Configure Integration Maps.
* Create a new map for the "Country" field (e.g., Source Value: "United States of America," Target Value: "USA").
* Apply the map to the Country field in the integration output.
* Test the output file to ensure the transformed value (e.g., "USA") appears correctly.
References from Workday Pro Integrations Study Guide:
* Core Connectors & Document Transformation: Section on "Configuring Integration Maps" details how to transform field values for vendor-specific formatting.
* Integration System Fundamentals: Explains how Core Connectors handle data transformation through maps rather than calculated fields or services for field-level changes.
NEW QUESTION # 38
The following XML code was generated through a RaaS that will be used in an EIB.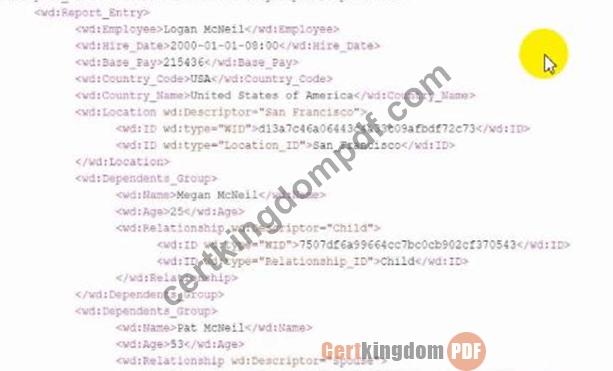

Within a template that matches on wd:Report_Entry, what XPath expression do you use to select the value of the Relationship_ID element?
- A. wd:Dependents_Group/wd:Relationship/wd:ID
- B. wd:Dependents_Group/wd:Relationship/wd:ID/wd:type='Relationship_ID'
- C. ./wd:Dependents_Group/wd:Relationship/wd:ID
- D. wd:Dependents_Group/wd:Relationship/wd:ID/wd:type='Relationship_ID'
Answer: C
Explanation:
The XML fragment shown follows the Report-as-a-Service (RaaS) structure typical for Workday custom report output:
<wd:Report_Entry>
<wd:Dependents_Group>
<wd:Name>Megan McNeil</wd:Name>
<wd:Age>25</wd:Age>
<wd:Relationship wd:Descriptor="Child">
<wd:ID wd:type="WID">7507df6a99664ce7bc0cb902cf370543</wd:ID>
<wd:ID wd:type="Relationship_ID">Child</wd:ID>
</wd:Relationship>
</wd:Dependents_Group>
</wd:Report_Entry>
Inside each <wd:Report_Entry>, the target value Relationship_ID resides under:
wd:Dependents_Group
→ wd:Relationship
→ wd:ID (wd:type="Relationship_ID")
When writing the template:
<xsl:template match="wd:Report_Entry">
XSLT uses a relative XPath (starting with ./) to navigate from the matched node.
Therefore, the correct XPath should be:
/wd:Dependents_Group/wd:Relationship/wd:ID
That expression selects the wd:ID element so you can then test/extract where wd:type="Relationship_ID".
Why the other options are incorrect:
Option
Why Incorrect
A & B
These use an equality test incorrectly inside the XPath expression - they would not return the node value and are syntactically invalid for value extraction.
C
Missing ./ - would still work in many cases, but Workday XSLT best practice is to use relative paths when inside a match.
Workday Pro Integration guidance for RaaS/XSLT stresses:
Always scope node selection relative to the current context tree using prefix-qualified XPath expressions.
NEW QUESTION # 39
Refer to the scenario. You are configuring a Core Connector: Worker integration with the Data Initialization Service (DIS) enabled. The integration must extract worker contact details and job information, including a calculated field override that determines phone allowance eligibility.
When testing, you run the Test Security Related Action from the Configure Integration Field Override step. Several field overrides display "No" in the Available by User column.
To ensure the ISSG has access to these field overrides and that "Yes" is displayed in the Test Security step, what configuration should you review?
- A. Identify the domain security policies securing the field overrides and grant Modify permissions.
- B. Assign the ISSG to the domain security policies that govern the web service operations with Get access.
- C. Grant View permissions to the ISSG for the domain security policies that secure the web service operations.
- D. Provide the ISSG View permissions to the domain security policies securing each overridden field.
Answer: D
Explanation:
The Test Security Related Action shows Available by User = No when the security group running the integration lacks View permissions to the fields used in the override logic.
From Workday documentation:
Field Overrides require the ISSG to have View access to the domain policies securing each field referenced in the override, otherwise Workday blocks the field from execution.
Therefore, the appropriate fix is to:
* Identify the domains that secure the calculated fields and overridden fields
* Grant the ISSG View access in those domain security policies
* Activate pending changes
Options B and C incorrectly focus only on web service operations.
Option D incorrectly suggests Modify access - but View is the required minimum.
NEW QUESTION # 40
What is the workflow to upload an XSLT file for a brand new Document Transformation system?
- A. Configure Integration Attachment Service, then Create Integration Service Attachment
- B. Create XSLT Attachment Transformation, then Configure Integration Attachment Service
- C. Create Integration Attachment Service, then Configure Integration Attachment Service
- D. Configure XSLT Attachment Transformation, then Create Integration Attachment Service
Answer: B
Explanation:
In the Workday Pro Integrations program, the process of uploading an XSLT file for a brand-new Document Transformation system follows a specific workflow designed to ensure the transformation logic is properly attached and configured within the integration system. The correct sequence involves first creating the XSLT Attachment Transformation and then configuring the Integration Attachment Service to utilize it. Here's a step-by-step breakdown based on Workday's integration methodology:
* Create XSLT Attachment Transformation:
* The initial step is to create an XSLT Attachment Transformation object within Workday. This involves uploading the XSLT file, which contains the transformation logic needed to convert XML data into the desired format for the Document Transformation system. In Workday, XSLT (Extensible Stylesheet Language Transformations) is used to define how data from a source (typically in XML format) is transformed into an output format compatible with an external system.
* To do this, you navigate to the Integration System, access the related actions, and select the option to create a new "XSLT Attachment Transformation." You then name the transformation, upload the XSLT file (with a size limit of 30 MB as per Workday specifications), and save it.
This step establishes the transformation logic as an object that can be referenced by the integration system.
* Configure Integration Attachment Service:
* Once the XSLT Attachment Transformation is created, the next step is to configure the Integration Attachment Service to incorporate this transformation. The Integration Attachment Service is a component of the Document Transformation system that handles the delivery or processing of the transformed data.
* In this step, you edit the integration system, navigate to the "Services" tab, and configure the Integration Attachment Service. Here, you specify the previously created XSLT Attachment Transformation as the transformation to be applied. This links the XSLT logic to the integration workflow, ensuring that the data processed by the Document Transformation system is transformed according to the uploaded XSLT file.
Why Other Options Are Incorrect:
* A. Configure XSLT Attachment Transformation, then Create Integration Attachment Service:
This is incorrect because you cannot "configure" an XSLT Attachment Transformation before it exists.
It must first be created as an object in Workday before any configuration or association with services can occur.
* C. Create Integration Attachment Service, then Configure Integration Attachment Service: This option skips the creation of the XSLT Attachment Transformation entirely, which is a critical step.
Without the transformation defined, configuring the service alone would not enable the XSLT upload or its functionality.
* D. Configure Integration Attachment Service, then Create Integration Service Attachment: This sequence is reversed and misleading. The Integration Attachment Service must be configured to use an existing XSLT Attachment Transformation, not the other way around. Additionally, "Create Integration Service Attachment" is not a standard term in this context within Workday documentation.
Workday Pro Integrations Study Guide References:
* Workday Integration System Fundamentals: This section outlines the components of an integration system, including the use of XSLT for document transformation and the role of attachment services.
* Document Transformation Module: Specifically details the process of uploading and applying XSLT files, emphasizing the creation of an XSLT Attachment Transformation followed by its configuration within the integration services.
* Core Connectors and Document Transformation Course Manual: Provides practical steps for setting up transformations, including the sequence of creating and then configuring transformation attachments (e.g., Activities related to "Upload a Custom XSLT Transformation" and "Edit XSLT Attachment Transformation").
* Workday Community Documentation: Confirms that XSLT files are uploaded as attachment transformations and then linked to services like the Integration Attachment Service for processing.
NEW QUESTION # 41
A vendor needs an EIB that uses a custom report to output a list of new hires and the date they are eligible for benefits. You have been asked to create a calculated field that adds each worker's hire date + 85 days and displays the result in YYYY-MM-DD format.
Which calculated field functions do you need to accomplish this?
- A. Date Constant, Arithmetic Calculation, Format Date
- B. Numeric Constant, Date Difference, Format Date
- C. Date Constant, Increment or Decrement Date, Format Date
- D. Numeric Constant, Increment or Decrement Date, Format Date
Answer: D
Explanation:
You are asked to create a calculated field that:
Takes the Hire Date
Adds 85 days
Formats it as YYYY-MM-DD
To accomplish this in Workday, you need the following calculated field functions:
Numeric Constant → define 85
Increment or Decrement Date → add 85 days to the Hire Date
Format Date → convert the resulting date to YYYY-MM-DD
Why other options are incorrect:
A . Date Constant would define a fixed date, not a dynamic calculation.
B . Date Difference is for subtraction between two dates.
C . Date Constant is still incorrect for offsetting a variable date.
NEW QUESTION # 42
......
Authentic Workday-Pro-Integrations Exam Dumps PDF - Dec-2025 Updated: https://www.certkingdompdf.com/Workday-Pro-Integrations-latest-certkingdom-dumps.html
Workday-Pro-Integrations Dumps Special Discount for limited time Try FOR FREE: https://drive.google.com/open?id=1RoQK_T2ZYQRH6DCMkTtC8WfaNBL35X8j